Ubuntu Wi-Fi Client Information
When troubleshooting Wi-Fi connectivity issues, gathering information from the infrastructure side of the network is only half of the picture. In addition to understanding how your Wi-Fi network is configured and performing, it is critical to understand how the wireless network looks from the wireless client’s point of view. In this article I present a few useful snippets that may help you if you have an Ubuntu client that you need to investigate.
Understanding AP channels plans, their transmit power, the coverage that they provide and a whole host of infrastructure-side parameters is very useful when diagnosing Wi-Fi client issues. However, even when you have (what you consider to be) a well designed, well configured network, there may still be some wireless clients that refuse to play nicely on your network.
I recently had issues with a number of Ubuntu laptops that were having connectivity issues on a network I was investigating. Once you’ve checked the usual issues that may cause connectivity problems, it’s time to try and understand the world from the clients view of the world. To do this, you need to gather data from the client so that you can see the network in the same way as the client sees it.
This can be quite a challenge, depending on the client-type and the tools that you may have available to you. This is particularly true in corporate environments, where locked-down, standard builds may be in-place. This can make it quite tough, so that you may need to get a little creative.
This article shows a few useful commands and code snippets I used to recently investigate issues on Ubuntu laptops. It’s certainly not a comprehensive guide to every command and tool available, but it will save me some hunting around next time I need to do this. :)
MAC Address & Interface Name Information
The first thing you need to know when investigating Wi-Fi client issues is the MAC address of the client. It’s also useful to know the name of the Wi-FI NIC interface to feed in to other commands that we’ll use later.The MAC address of a client in Ubuntu can be determined using the CLI (terminal) command “ifconfig” (see example screenshot below).
The output of the command can be quite tricky to wade through is you want a quick snapshot of what the client can see. A condensed version can be seen by applying some filtering with the grep command:
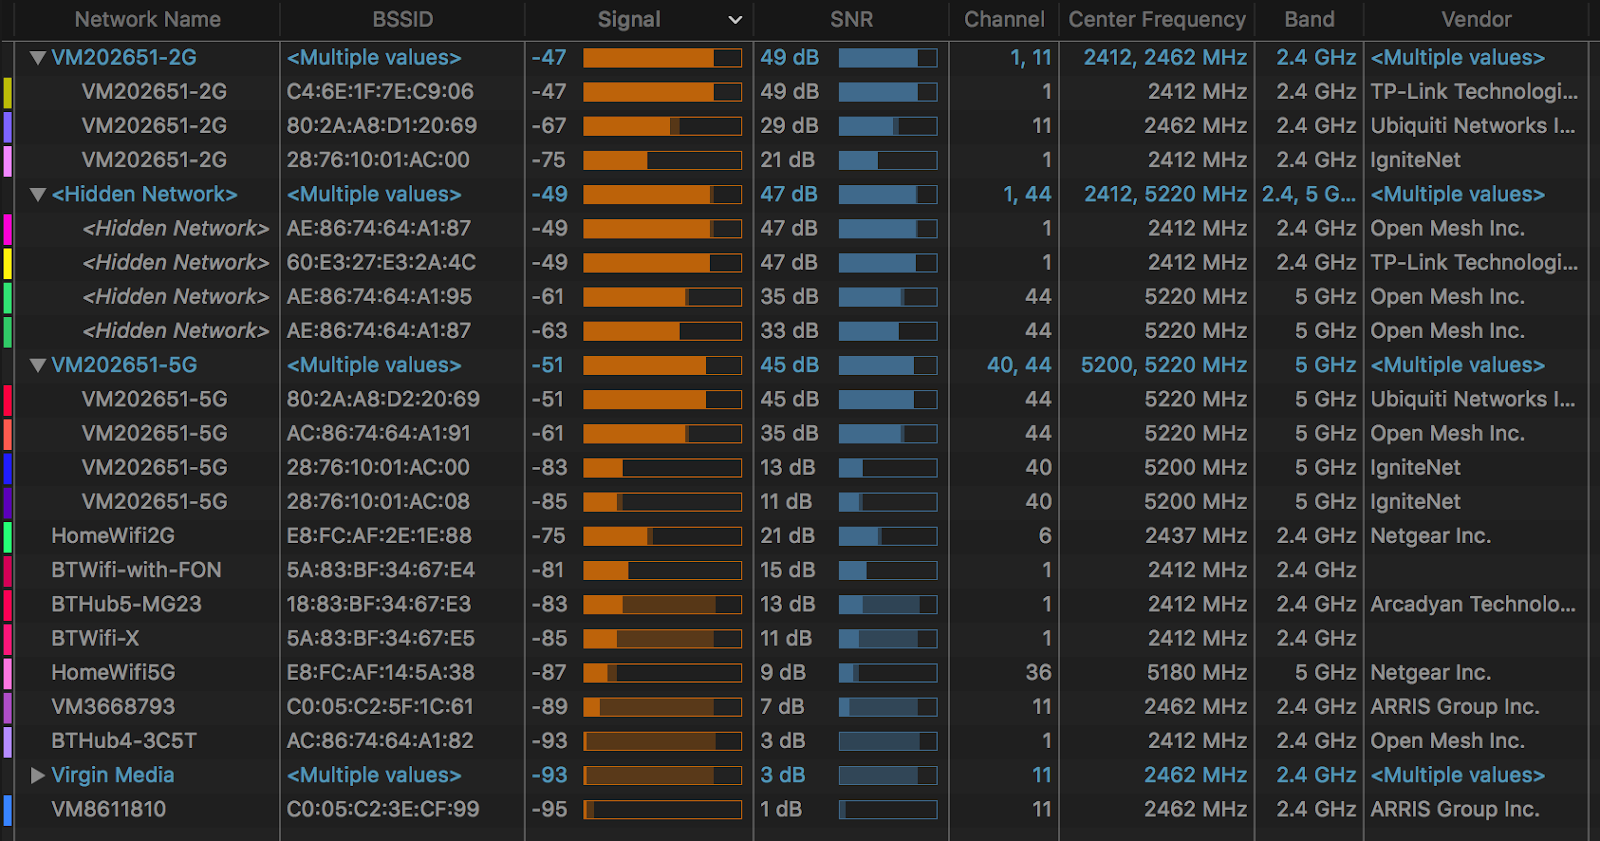
Although this information is useful, it would be even more useful to have this data output in a CSV format. This is a little more challenging (for me) from a scripting perspective, so I have detailed a script to do this over on github: https://github.com/wifinigel/UbuntuWiFiScan. The really cool thing about the CSV option in this script is that you can save the output as a file to import into WiFi Explorer (https://www.adriangranados.com/apps/wifi-explorer) to do a little more analysis of the data (which is pretty dammed cool!).
Unfortunately, the environment in which I was performing troubleshooting work did not allow me to install any new applications on the Ubuntu machines that I was investigating.
However, if you are able to install an application, I strongly recommend that you take a look at Wavemon. It's launched from a terminal window. It isn’t necessarily as pretty as a full-blown, GUI-based app, but it’s fast and packs a lot of very useful information about the clients view of the “Wi-Fi world” in to a small space.
Here are a few screenshots showing the types of information you can get out of Wavemon. To install, you just need to enter the following terminal commands:
Background
I recently had issues with a number of Ubuntu laptops that were having connectivity issues on a network I was investigating. Once you’ve checked the usual issues that may cause connectivity problems, it’s time to try and understand the world from the clients view of the world. To do this, you need to gather data from the client so that you can see the network in the same way as the client sees it.
This can be quite a challenge, depending on the client-type and the tools that you may have available to you. This is particularly true in corporate environments, where locked-down, standard builds may be in-place. This can make it quite tough, so that you may need to get a little creative.
This article shows a few useful commands and code snippets I used to recently investigate issues on Ubuntu laptops. It’s certainly not a comprehensive guide to every command and tool available, but it will save me some hunting around next time I need to do this. :)
MAC Address & Interface Name Information
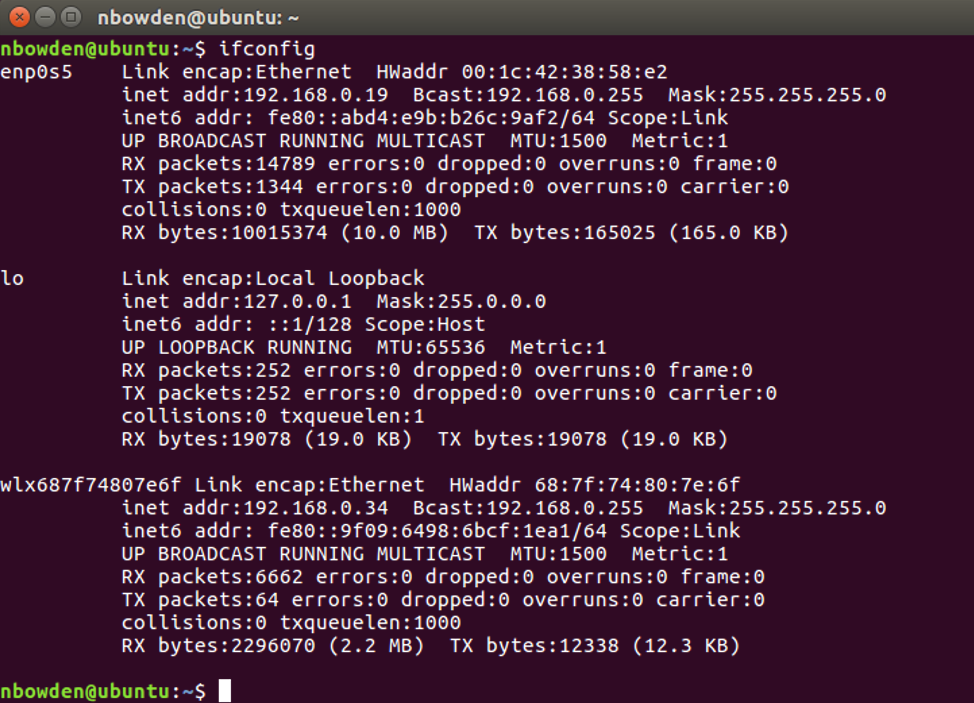
The first thing you need to know when investigating Wi-Fi client issues is the MAC address of the client. It’s also useful to know the name of the Wi-FI NIC interface to feed in to other commands that we’ll use later.The MAC address of a client in Ubuntu can be determined using the CLI (terminal) command “ifconfig” (see example screenshot below).
Multiple adapters may be listed (e.g. Ethernet, Wi-Fi etc.), depending on the hardware build of the Ubuntu machine. The “ifconfig” shows the MAC address of the adapter in the “HWaddr” field. In the example screenshot below, the ethernet adapter MAC address is 00:1c:42:38:58:e2.
The WLAN adapter name usually starts with a “W” (e.g.wlan0, or wlx687f74807e6f in the example below).
Fig 1 - Find MAC address and interface name using “ifconfig’
Wi-Fi NIC Information
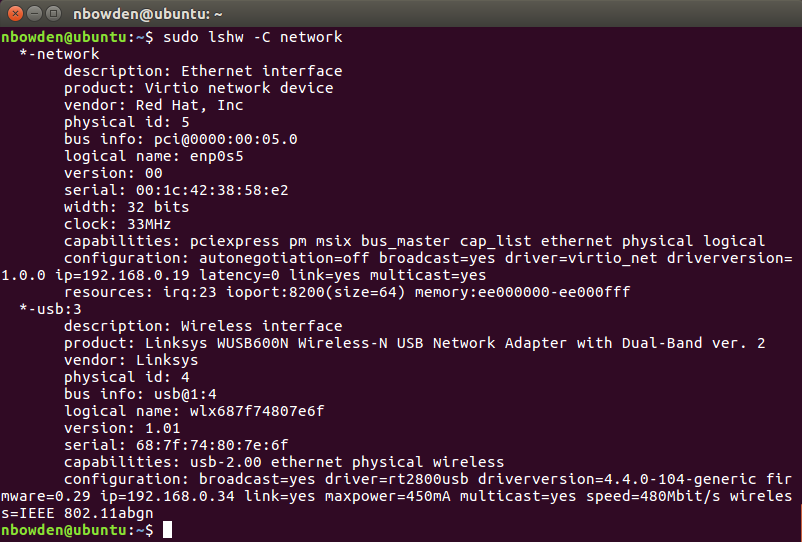
It’s useful to find out a little more about the wireless NIC hardware to anticipate the clients’ capabilities. The CLI command “sudo lshw -C network” provides useful information about the Wi-Fi NIC card including the manufacturer, driver version and supported 802.11 amendments.
The screenshot below shows the output created by this command:
Fig 2 - Find Wi-Fi NIC driver info using “sudo lshw -C network”’
Channel Support
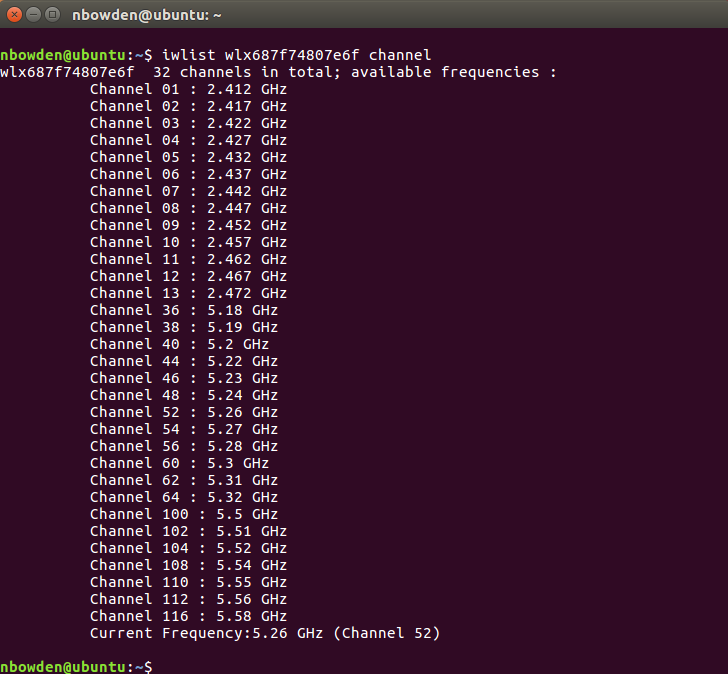
Hopefully, if you have modern wireless hardware and drivers, your client is going to support all of the available channels used on the 2.4 & 5GHz bands. But, it’s always worth checking to ensure that your clients won’t “blackhole” if they enter an area that is served by a channel that the client does not support. The CLI command “iwlist <adapter_name> channel” shows us the list of channel supported by the client.
Note that the “<adapter_name> field above is the name we obtained for the Wi-Fi NIC using the “ifconfig” command.
Fig 3 - Find Wi-Fi NIC supported channel info using “iwlist <adapter_name> channel”’
Client Capabilities
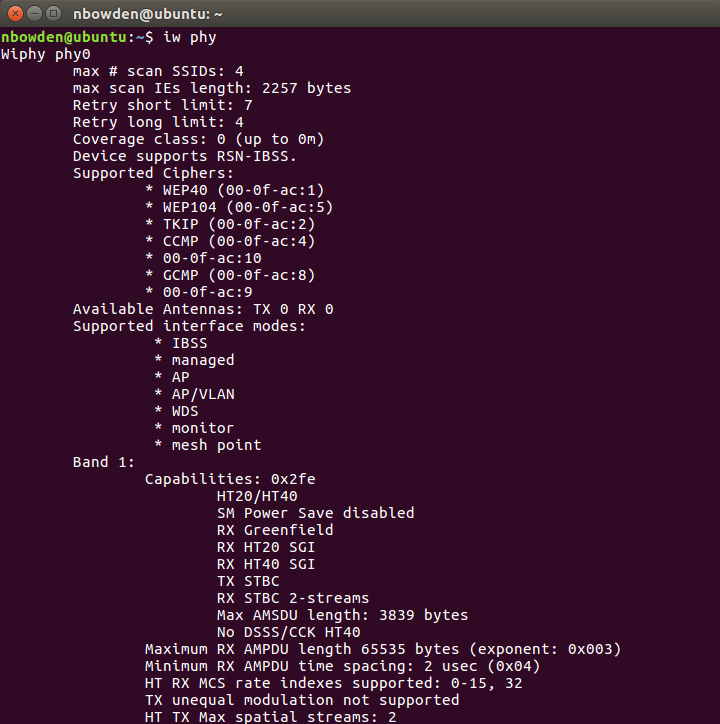
If you are dealing with a client that is new to you, it is important to understand is capabilities. The command “iw phy” provides a wealth of information about the supported capabilities of the adapter.
I have provided a screenshot below of part of the output of this command, but the actual output is far more extensive and provides very detailed, rich information. This is information is invaluable for both troubleshooting and design activities.
Fig 4 - Find Wi-Fi NIC capabilities using “iw phy”
Client Connection Information
When a client is connected to a network, it is important to see how that connection looks from the client’s perspective. We may be able to see client connection information by interrogating its information from a wireless controller or access point that the client connects to, but that is only half of the story (i.e. how the clients looks from the infrastructure perspective).
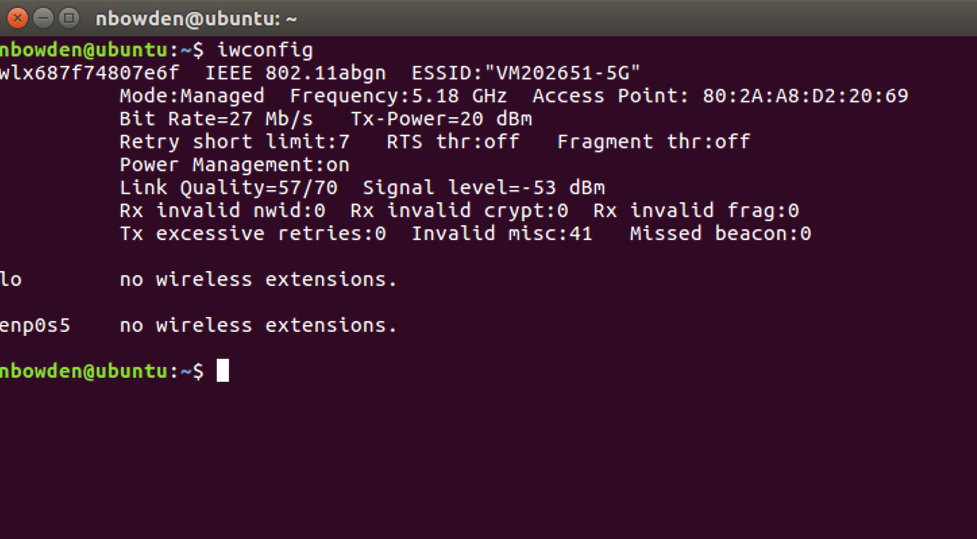
To understand the behaviour of a client, we also need to be able understand the other half of the “conversation” and see how the wireless infrastructure appears from the client’s perspective. The command “iwconfig” provides a useful view of how a client’s connection appears from the client’s view of the world.
The screenshot below shows the output of the “iwconfig” command. From the output, it is possible to see details such as the channel used, received signal level (probably the most important value) and connection speed.
It also provides an interesting field called “Link Quality”. This sounds interesting, but to date, I’ve not been able to determine what this actually means or what factors contribute to its value.
Disappointingly, the output does not report a noise or SNR value :(
Fig 5 - Find connection information using “iwconfig”
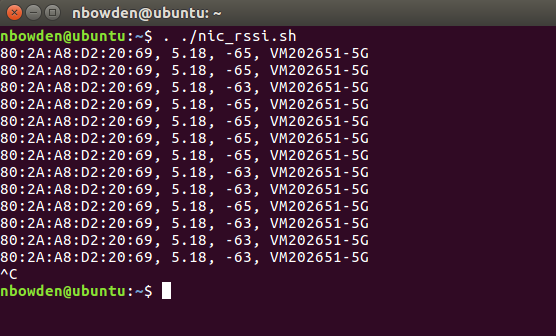
It can be very useful to repeatedly run the “iwconfig” command and capture its output (for example when assessing roaming behaviour). I’ve put together a short script to repeatedly run the command and output some of the output fields in a CSV format. The output can be reviewed manually or perhaps opened in a tool such as Excel to assess the data provided.
The script is shown below.
#!/bin/bash
#
# Set the name of your Wi-FI NIC below (use output from iwconfig)
#
WIFINIC="wlx687f74807e6f"
while [ 1 ]
do
RFINFO=(`/sbin/iwconfig $WIFINIC | grep -oP '(?<=Signal level=)(.*)(?= dBm)|(?<=ESSID:")(.*)(?=")|(?<=Access Point: )(..:..:..:..:..:..)|(?<=Frequency:)(.*)(?=GHz)'`)
SSID=${RFINFO[0]}
FREQ=${RFINFO[1]}
BSSID=${RFINFO[2]}
RSSI=${RFINFO[3]}
echo "$BSSID, $FREQ, $RSSI, $SSID"
sleep 0.5
done
Create this script using your favourite Linux editor and run it as shown below (hit Ctrl-C to stop it). I’ve named the script “nic_rssi.sh” in this instance:
Fig 6 - Scripted output of the “iwconfig” command
(BONUS FEATURE: I did some additional work on this particular script and have put an improved version on GitHub: https://github.com/wifinigel/UbuntuRoamTest)
Available Networks Information
Understanding which networks and access points a client is able to “see”, together with the information it has about each network, is useful when trying to understand client behaviour when troubleshooting.
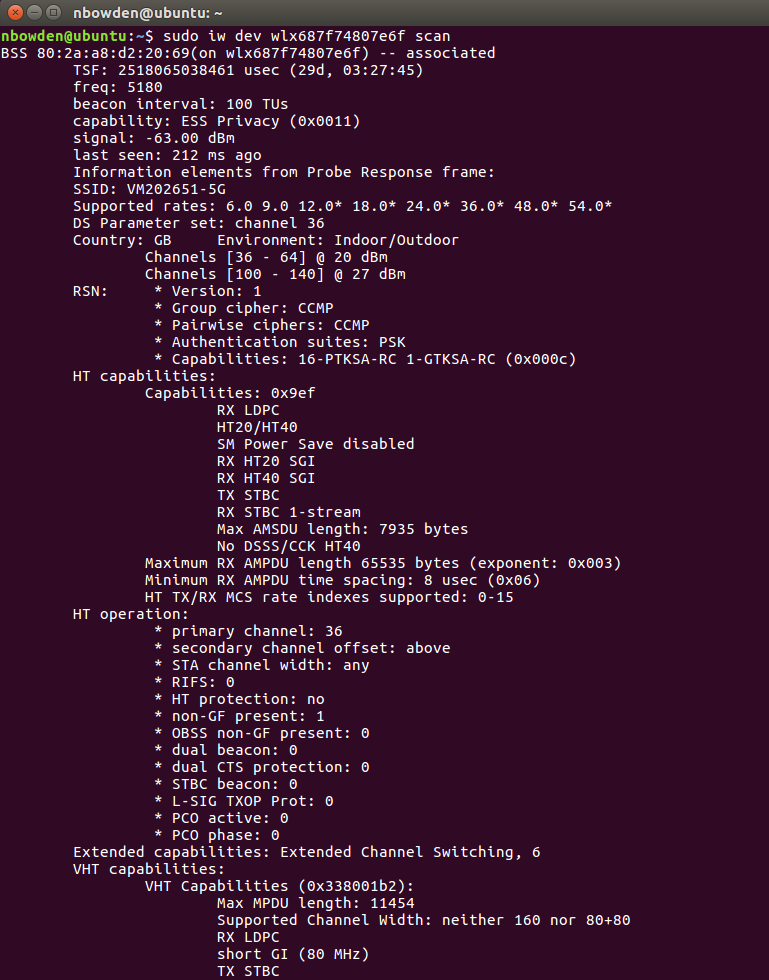
Linux provides an incredibly useful command to provide detailed data about networks that can be seen by a client: “sudo iw dev <interface_name> scan”. Note that the “<interface_name>” field is determined by using the output of the “ifconfig” command.
This command causes the wireless client to scan all channels and report on the Wi-Fi networks it hears. It is worth running the command a number of times, as it may not hear all networks each time a scan is performed - it is dependant on whether nearby networks are sending beacons at the time channels are scanned by our NIC adapter.
This is a command that requires elevated privileges to run, so is executed with the “sudo” command. Your (Ubuntu) user account must be capable of running with the elevated privileges required to run the command (i.e. root privilege).
A snippet of the output produced is shown below, though this represents a tiny fraction of the information provided. Each detected network is shown in significant detail, with data that is invaluable in troubleshooting scenarios:
Fig 7 - Sample output from the “sudo iw dev <interface_name> scan” command
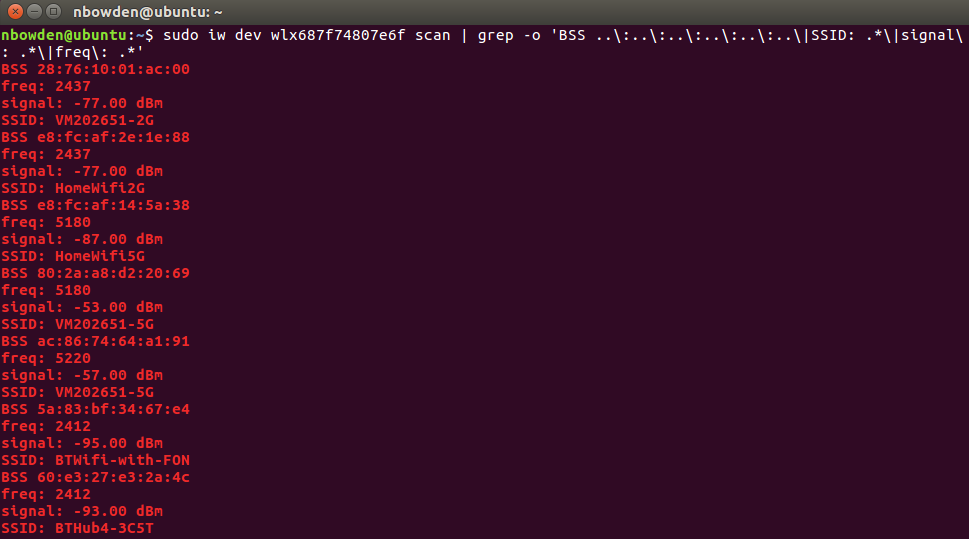
The output of the command can be quite tricky to wade through is you want a quick snapshot of what the client can see. A condensed version can be seen by applying some filtering with the grep command:
sudo iw dev wlx687f74807e6f scan | grep -o 'BSS ..\:..\:..\:..\:..\:..\|SSID: .*\|signal\: .*\|freq\: .*'
Fig 8 - Using grep to filter output from the “sudo iw dev <interface_name> scan” command
Although this information is useful, it would be even more useful to have this data output in a CSV format. This is a little more challenging (for me) from a scripting perspective, so I have detailed a script to do this over on github: https://github.com/wifinigel/UbuntuWiFiScan. The really cool thing about the CSV option in this script is that you can save the output as a file to import into WiFi Explorer (https://www.adriangranados.com/apps/wifi-explorer) to do a little more analysis of the data (which is pretty dammed cool!).
Fig 9 - Importing CSV data in to WiFi Explorer
Wavemon
Unfortunately, the environment in which I was performing troubleshooting work did not allow me to install any new applications on the Ubuntu machines that I was investigating.
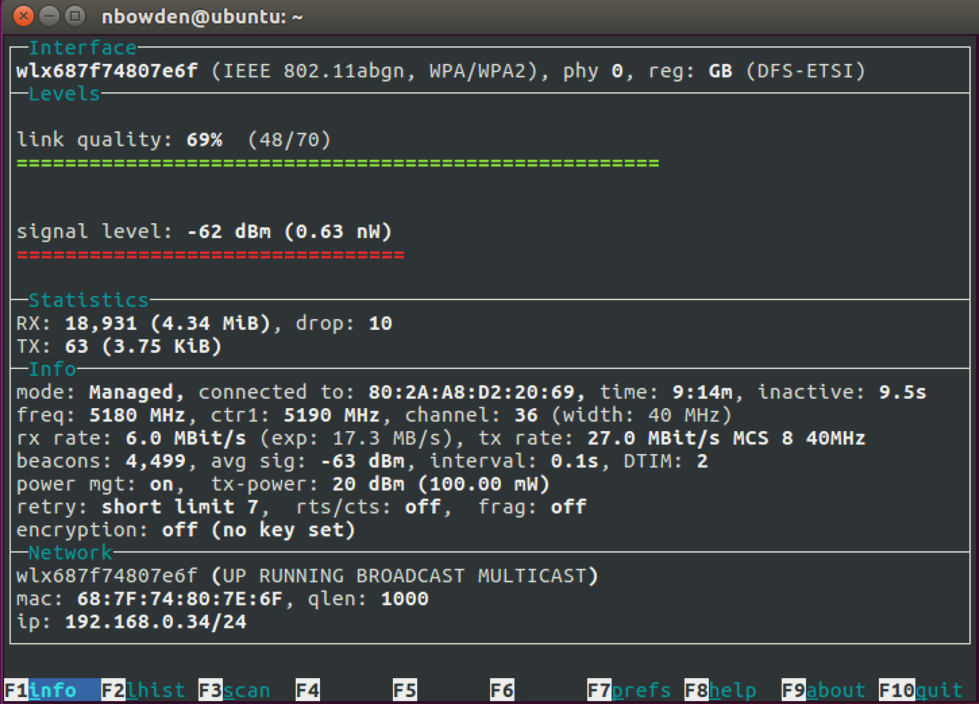
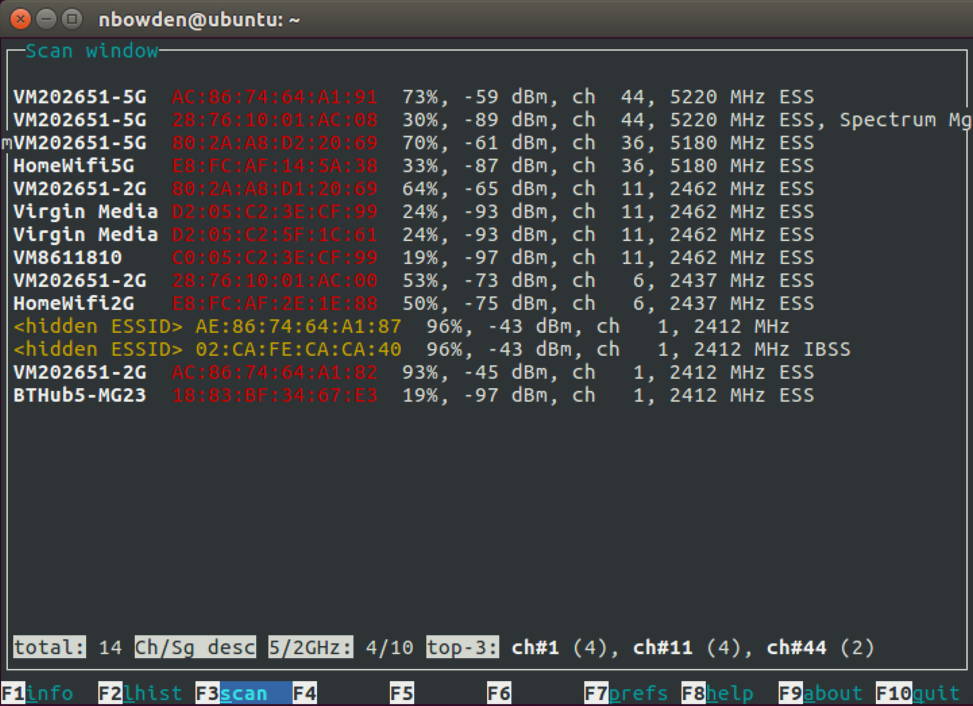
However, if you are able to install an application, I strongly recommend that you take a look at Wavemon. It's launched from a terminal window. It isn’t necessarily as pretty as a full-blown, GUI-based app, but it’s fast and packs a lot of very useful information about the clients view of the “Wi-Fi world” in to a small space.
Here are a few screenshots showing the types of information you can get out of Wavemon. To install, you just need to enter the following terminal commands:
sudo apt-get update
sudo apt-get install wavemon
Fig 10 - Wavemon Link Information
Fig 11 - Wavemon Network Information
References
Here are few useful references from items covered in this article:
- Roam test script: https://github.com/wifinigel/UbuntuRoamTest
- Wi-Fi scan script: https://github.com/wifinigel/UbuntuWiFiScan